Sunday, September 5, 2010

case matching my E50 puch engine

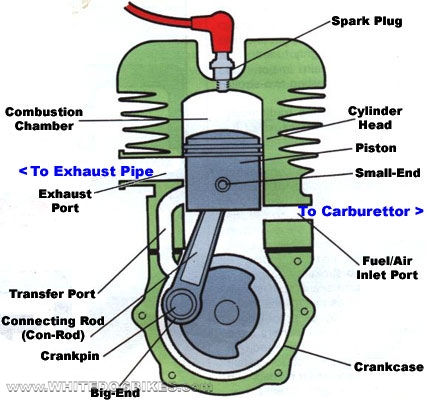
i have finally gotten around to case matching my E50 puch engine. for those of you that don't know what case matching is... well, when i upgraded the cylinder on my moped the transfer ports (see diagram) on the new cylinder are much larger than the transfer ports on the crank case. the transfer ports are the path the fuel/air mixture takes from the crank case to the top of the cylinder where it's compressed and then ignited. because the stock ports and the new ports don't line up properly, the flow of air/fuel is restricted and the engine is not running as efficiently as it could. so, that is where "case matching" comes in. case matching is removing material from the transfer ports on the crank case side so that they match the ports on the cylinder side.

here are are transfer ports on the stock crank case:


you can see that the transfer ports are considerably larger on the new kit:


anyway, i used the gasket to mark the area on the crank case that needed to be removed. the area that's coming off is marked with sharpie:


ideally you case match when the the crank isn't in the engine, this makes it easier to keep the crank and the case clean. when case matching there are tiny pieces of aluminum flying around as you are expanding the port. obviously little flecks of metal are not good for the engine. they can easily wreck pistons, cylinders, and bearings. i did not want to take my crank case apart again, so i masked the crank and the bearing on the connecting rod with lots of tape and plastic. a much cleverer solution is to use silly putty. i would recommend that if you're not willing/able to tear the whole engine apart.

i did my milling with a dremel and a 1/4" and a 1/8" carbide burr (which are generally meant for more brittle materials, but didn't seem to get gummed up on the aluminum). while doing the case match, you don't need to cut the port straight down, and you don't need to go super deep. i angled the port in and went down about 0.75"- 1.0". here is what the port looked like after the milling:


then i just hit it with some 200 grit sand paper and cleaned it like crazy. i put the engine back together and i'm probably getting 2 extra miles per hour. now i'm just eagerly awaiting my new sprockets.

also, i found confirmation of how that voltage regulator is wired. i was right, it does act like a shunt:
http://www.mopedarmy.com/forums/discuss/6/152772/152772/

Monday, August 30, 2010

seitan


our friend amanda invited us up into the mountains a few weeks ago and made us sandwiches from homemade seitan and served home brewed mead. both were amazing and so we were inspired to make our own seitan. all you really need is wheat gluten flour and about an hour and a half. it was super easy, although i don't think we kneaded long enough and so the texture wasn't quite right, but now i'm extra motivated to try it again. i also want to give kombucha a try soon.

Sunday, August 29, 2010

failing and fixing

so, as you may have read, i added a kit to my puch magnum. i was pretty proud of myself, although it still needed some adjustment to get it working perfectly. mainly it needed to be properly tuned. this meant determining if the air to fuel ratio was too rich (too much fuel) or too lean (too much air). running too rich isn't efficient as it wastes fuel and can also adversely affect performance (i.e. bogging). running too lean is not good at all. this condition causes the engine to run too hot and can cause serious damage to the engine (i.g. seizing the piston). ideally you want to be right in the middle of those and perhaps erring a bit on the side of rich, just to be safe. there are several factors that affect the air/fuel mixture (main jet, idle jet, throttle needle position, air filter, air leaks, altitude, etc). the most important of these when operating at wide open throttle (wot) is the main jet. the main jet is just a little piece of brass with a hole in it and allows fuel to flow into the carburetor where it mixes with air. there is a number stamped on the jet that indicates how large the hole is (and therefore how much fuel it will let in). to figure out what the fuel mixture is you have to do something called a plug chop. it's basically running the moped at wide open throttle for about a mile with a fresh spark plug and then taking it out and checking the color. if it's black then it's running too rich and if it's white it's too lean. tan to chocolate colored is just about right.

anyway, i did a couple plug chops and found a spot where it was brown, but probably on the lean side. i was running an 86 jet and wanted to try an 88, but didn't have one. i was going to order one, but this was right as i was moving. i figured i was close enough that i wouldn't hurt it. i had to make it 19.2 km (thanks google earth) from my old place to the new house. i made it 16.3 km. i pulled over and sure enough the engine was seized... oops! that's a first. so, i locked it to a pole and walked the remaining 3 kilometers (this is part of the fun of moped ownership). the next day i picked it up with a friend's truck and brought it back to the house. i also managed to blow out all three lights on the bike. that wasn't necessarily a surprise, but it's still a pain. this was caused by the bike going faster than it was originally designed to, which caused a spike in the voltage coming from the magneto, which blew everything up. i'll have to fix that too.

the first step was to take it apart and figure out what happened. i thought the piston had siezed, which is bad, but sometimes you can pound it loose with a hammer and a piece a wood and just keep riding it. it might require a new piston ring, piston, or cylinder if it's really bad. anyway, i took off the head and the cylinder and it turned out the piston was moving freely. that meant whatever went wrong happened in the crank case. i've never taken a crank case apart, so let the adventure begin.

first, it turns out they used flat head screws to hold the two halves of a E50 engine case together. this made disassembly a major hassle as many of the screws did not want to turn. i barely got it apart as i nearly stripped the heads on a couple of them. i made a note to replace them with socket head cap screws. so, i finally got it apart and this is what the crank looked like:


as you can see, the bushing that goes between the connecting rod and the wrist pin was mangled (although a lot of the mangling in the photo is from me trying to rip it out). i also cooked the bushing between the connecting rod and the crank. you can see all the heat marks around the area. this is what seized my engine. i could have tried to replace those bushings, but i decided to take the opportunity to replace the whole assembly with a higher performance crank. i also decided to replace the bearings and seals while the thing was torn apart (they sounded pretty worn out anyway).

by the way, i used this tutorial for rebuilding an E50 engine, which was a huge help.

here is engine pulled apart with the crank missing and just the gear that connects the clutch to the drive sprocket:

here are the two halves of the engine case. i decided to clean everything while it was in pieces:

this is the one of the old bearings coming off. i had to use a gear puller, which isn't shown:

then we skip all the way to the case reassembled, because i did a terrible job of taking photos. essentially is was straight forward. i had to take the old bearings and seals off, put new bearings and seals on the new crank, seal the case with silicon and then bolt it back together (with the new socket head cap screws). i also decided to put new heavier springs in the clutch while i had it apart (which also required buying a clutch puller). this means the engine revs higher before the clutch engages the wheel, which improves acceleration. you can see the new crank has needle bearings instead of brass bushings:


check out those sweet socket head cap screws:


the verdict: total success. it is really gratifying to have the whole engine in a bunch of little pieces laying around the garage, and then a few hours later i'm rocking down the street. i put in the 88 main jet and did another plug chop. it looks better, but i am going to try the 90 and see how that works. i got a voltage regulator which should minimize blowing out lights. although i'm not 100% how it works. i thought it was just supposed to to inline, but one of the leads is grounded, so that means the light doesn't work at all. right now i have it hooked up as a shunt. i am assuming when the voltage goes over a certain point it starts dumping power. i dunno? so far my headlight still works. i still have to revisit the electrical stuff and then comes the cosmetic improvements. first step: new lower handlebars.

Thursday, August 26, 2010

cool baby clothes from recycled fabric


my friend nathalie sent out an email about her cousin in berlin who makes baby's clothes from recycled fabrics. i just had a minute to check the site out and they are amazing. so, if you want your baby to be the coolest kid on the block and promote sustainability at the same time, have a look: http://www.laurie-d.de/

Tuesday, August 3, 2010

birthday making

i made this passport cover as a birthday present last week. the cover is 3mm thick designer felt and the cover sleeves are made out of one of my brother's old shirts. thanks matt!


Wednesday, July 14, 2010

kitting puch magnum

so, i've always been a purist when it comes to mopeds. i like to keep everything stock, or as close as i can. that changed today, when i did a cylinder/carburetor/exhaust upgrade to my 1978 puch magnum xk. i decided to do this because, while the stock magnum is great for getting around boulder, i can't make it easily to any of the surrounding cities (speed limit is at least 45 mph, even on the back roads). the stock moped tops out at around 33 mph. so, to get some more speed out of it i ordered a bunch of parts from treats and 1977. what i got:

- k-star 70cc cylinder kit w/ high compression head. i got the k-star because it was cheap and i didn't come across many people who have had issues with it. for those of you not familiar with mopeds, they all come stock with ~50 cubic centimetres of displacement (the engine size). this is because larger engines are considered motorcycles and therefore require a special license, higher cost of registration, and higher cost to insure (plus they use more gas). in order to get around this, you can buy a "kit" that replaces the cylinder, head, and piston and increases the displacement.
- 19mm dellorto phbg carburetor. a bigger engine needs more air and fuel, which means it needs a bigger carburetor (the part that mixes the air and fuel before it goes into the engine).
- 19mm intake. a bigger carb requires a bigger intake.
- tecno estoril exhaust. more air/fuel means more exhaust and therefore a larger exhaust pipe. i chose the estoril because it has a large powerband (range of RPMs where the engine is creating good torque) and the powerband is located in the middle of the RPM range. this means that it allows relatively good low end torque, which is important for starting, while still giving a good top speed.
- uni pod air filter. clean air means a cleaner carburetor and a cleaner cylinder, which makes for a happier carb and cylinder.
- ignition micrometer. i was tired of my little stick with lines drawn on it. this makes it easier to accurately set the timing (when the spark plug fires).
- cylinder studs. these hold the cylinder and the head to the crank case. i could have used the stock studs, but the threads on one of them was stripped. pow! new studs.

so, let the fun begin. first step, take the old head, cylinder, and piston off:


here is the k-star kit that i'm going to put on with the hi compression head:


first i have to put the new piston on. here's the new piston on the original connecting rod as well as a photo of the new and old piston showing the difference in size. woo! 20 more cubic centimetres:


now i just slide the cylinder over the piston, which is surprisingly easy since there is only one piston ring:


uh oh! first problem. my cheap-o k-star kit has a poorly tapped spark plug thread. this means the spark plug will not thread onto the head:


solution: buy a $30 tap and chase the threads (or send it back, but i am not patient). the proper tap for this spark plug is a 14mm x 1.25:


it was tricky getting the tap started in the existing threads, but i mustered enough patience and managed not to wreck the head. just be sure if you do this to clean off the head thoroughly. i used some isopropyl and a brush. pistons and cylinders don't take kindly to little metal shavings:


the head now attached with the spark plug in place:


next comes the carburetor and the intake. one of the float bowl vents was interfering with the moped's frame, so i just pulled it off. it still leans a little to one side, but it should be fine for now:


finally comes the exhaust:


i didn't expect the exhaust to mount properly since it was designed for a puch maxi and not a magnum. the mounting points don't line up, so i have to fabricate something. for now i'm just using a $4 exhaust mount that should keep it from breaking in half for the meantime:


the results: to my surprise it started right away. it was loud as hell because they sent me the wrong exhaust gasket, but i'm working on fixing that. so, i took it out on the street and it ran pretty well. it was bogging at wide open throttle, which i thought was because it was running lean, so i raised the throttle needle up a notch. it ran a lot better, so i did a plug chop and found it was still running lean, so i up-jetted to a 92 (from the stock 85). after another plug chop it looked better although i think i'm going to try the 95 i have to see how that runs. i'd rather be running rich, especially while i'm breaking in the new cylinder. so, i haven't had anyone pace me in a car to figure out the top speed (the speedometer only goes to 30 mph), but my best guess is she's topping out at 45 mph right now and i should be able to get a little more once i dial in the tuning. i also need a bit of tubing to attach the air filter to the carb, since there is no room for the larger filter. in conclusion: sweet!


next step:
- fabricate a mount for the exhaust. i really wish i had welding equipment.
- tune to perfection.
- install low rise handlebars
- get a voltage regulator so i stop burning out break and tail lights.
- paint the frame.

Tuesday, June 1, 2010

ipod touch screen repair. success!... sort of

as i mentioned in the last post, my ipod touch screen is cracked and i had the intention of fixing it. as i also mentioned/quoted in my last post, it is good to have the courage to screw up. well, i succeeded in both regards. i fixed the screen and i screwed up. i'll walk you through both below:

so, here is the busted screen. everything works just fine, it just looks lame. before i embarked on this repair it did occur to me that i could potentially make things worse. the new screen is on the right. i got it and a couple tools for taking it apart off ebay for $13.


first step: get it apart. not so tough.


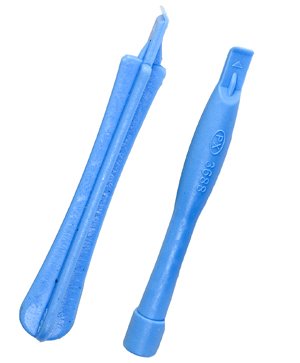
the ipod is held together by a bunch of tiny philips head screws and some adhesive. it takes some care and patience to carefully pry the battery off. i used my library card, but anything thin and plastic should do. for a step by step video for how to disassemble a 1st generation ipod check out this youtube video.


here's a better view of the cracked glass once i have all the electronics disconnected.


in order to remove the glass from frame you have to heat up the glue. this makes it easier to pop it out. unfortunately, despite the "pro" moniker, the andis EuroPro 1875 was not the most effective blow dryer. it eventually got the job done, but i recommend i higher quality dryer or perhaps a heat gun.


once i got the old piece of glass out i re-heated the glue with the dryer and stuck in the new piece. i'm not sure how much i trust this method, but it seems to be working for now. the best bet is probably to get some of that 3M double sided adhesive.


and then disaster! i was trying to be careful and slow with everything, but i still managed to break the little ribbon cable that attaches the wifi antenna. i tried to come up with a way to fix it, but it's pretty much a lost cause. the only way (i can see) to fix it is to replace all the electronics. if you happen to have a busted 1st generation ipod taking up space in a drawer i'd happily take it off your hands and try to make a frankenstein ipod. i'd gladly buy you a six pack of beer or root beer if you're underage. anyway, it's actually not too bad. the wifi still works, but i have to be within 10 feet of a router. that is silly and renders the internet nearly useless, but i do have a new shiny screen. and while that may not be a fair trade off, i'm glad i made the effort. i certainly won't be afraid to take apart my ipod again in the future, and next time i'll be more careful with the wifi antenna.


check out that beautiful screen!